Objective:
Figure out how the technical aspects of the will be accomplished. How will we manipulate the video? How will we upload the video? Etc.
On this Page:
A. Video Switching Platform
B. Video Ingest Method
C. Paperwork
D. Live vs Pre-Recorded Performances
B. Video Ingest Method
C. Paperwork
D. Live vs Pre-Recorded Performances
A. Identifying Video Switching Platform
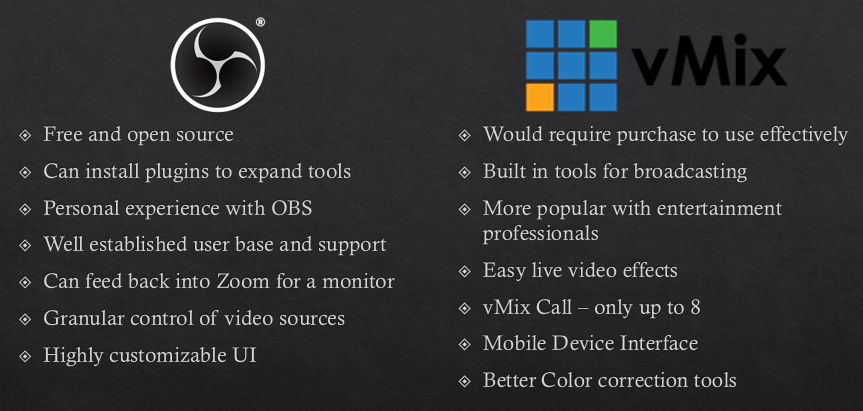
The journey began with first figuring out which video software I was going to use to produce the show. The main two options I had narrowed down were Open Broadcast Software (OBS) and vMix. In my research I found that they could produce a similar product but had a very different way of getting there. OBS would require more backend work to use like a video switcher where vMix had many features baked into the software. While the first pricing tier of vMix is not too expensive, most of the features that may make it worth it were behind a paywall. This made the decision to use OBS cut and dry as with a little bit of tuning and plugins I could create the effects desired by the designers.
Quick Comparsion List made by TJ
B. Picking Video Ingest Method
After selecting to use OBS my next step was to figure out how we were going to get video into OBS to do live video switching. After doing some research I had a few options that seemed like they would work listed below.
Option 1: NDI Virtual Input
NDI Tools by NewTek, Inc. is a free set of network based tools for video production. Their tool "virtual input" theoretically would be the perfect solution allowing me to directly pull video and audio from a video calling software (like Zoom) to mix in OBS. This would allow performers, designers, and directors to interact and for me to mix the show in the "background". The only problem was the NDI Virtual Input was only supported by Skype, Google Hangouts, and Microsoft Teams which was not platforms fully supported by the University at Buffalo with professional licenses. After more research we might have been able to make NDI work with some extensive work in Skype or Microsoft Teams but decided against it because it would have required meddling with University email accounts and in the interest of trying to keep things simple.
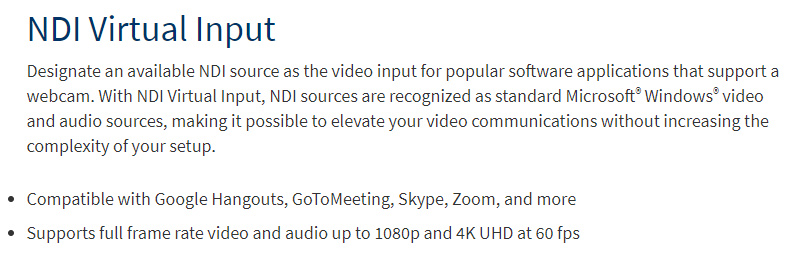
NDI Virtual Input Features - Image from https://ndi.tv/tools/
OBS Ninja Video Test
Option 2: OBS Ninja
An open source web-based software, OBS Ninja makes chat rooms for users to interact while giving a host links to directly input into OBS individual video and audio tracks. This was the best alternative since NDI did not work out. After doing some initial testing results looked good. Everyone could interact in the "chat room" and I had backend controls and could plug directly into OBS. We recorded a test video so designers and the director could see a preview of the new "production celling" we had. (Click on image to see test). The video shows a recording of Zoom meeting during which the OBS output was used as a camera input for Zoom. This was a proof of concept of the possibilities of OBS Ninja and as to how someone could live monitor the output.
OBS Ninja Tutorial
Once it was decided that we were going to move forward with OBS Ninja for video ingestion it was suggested that I make a tutorial so the company understood how to use the software. I recorded a live video using OBS to explain how to use it (Click the image to see the full video).
OBS Ninja Tutorial produced by TJ for Company
C. Live vs Pre-Recorded Performances
One of the questions that originated during pre-production was wheatear or not we were going to stream the show live, or pre-record the show and stream it later. Ultimately faculty and the director decided to have us pre-record the show to be streamed 24 hours later for each of the 10 performances as this was our first virtual production and to avoid a “2004 Superbowl/Janet Jackson” moment in case of a serious malfunction. While this decreased the stakes of production this also brought up the potential of post-production video editing after recording. It was decided that only major issues would be fixed in post as it would have been to reduce the time commitment during show week.
D. Paperwork
Here's paperwork that was developed in Pre-Production
Signal Path
The signal path was a living document (finished version on right, click on image to see progression) that was made in Photoshop so it could be highly visualized. The document was made by me to help keep track of the different components that were interacting and to help the design team visualize the technical process.

Video Signal Path made by TJ in Photoshop (One Label Redacted)

Video Storybaord Image from Orginal Document made by TJ
Video Storyboards
Before moving into rehearsal the Set Designer and I decided that an efficient method of communication would be to make storyboards that showed each video look. I used PowerPoint to create the building blocks by making objects representing the performers that could be manipulated by the designer. The Set Designer then went in and edited the document to demonstrate how each video scene should look which I would use to program the show in OBS.